If you are using Windows 7, 8 or 10 on your laptop then there’s an easy way you can turn your Windows laptop into a WiFi hotspot without installing any third party software. Though, currently there’s no user interface to configure or manage wireless hosted network feature in Windows OS but you can setup Hotspot using three easy netsh commands.
Just follow the one time setup steps to create a wireless Hotspot for your local network to connect multiple wireless devices like smartphones, iPads, tablets and other wireless gadgets to your high speed DSL or any other wired connection.
Commands we are going to use to setup and start Hotspot network:
netsh wlan set hostednetwork mode=allow ssid=HotspotName key=12345678
netsh wlan start hostednetwork
netsh wlan stop hostednetwork
First of all turn ON WiFi on your laptop.
There are three steps to successfully create virtual WiFi Hotspot in Windows OS:
- Setup Hotspot SSID and Key.
- Enable sharing on your currently active wired Internet connection.
- Start Hotspot.
NOTE: These steps are for one time setup of WiFi Hotspot network. At the end you will see how to create two handy shortcuts to start and stop Hotspot with just a click.
Setup Hotspot SSID and Key:
Open CMD prompt. Click Start menu > All Programs > Accessories > Command Prompt. Or just click Start menu and enter CMD in the search field. In both ways right click on Command Prompt and Run as administrator.
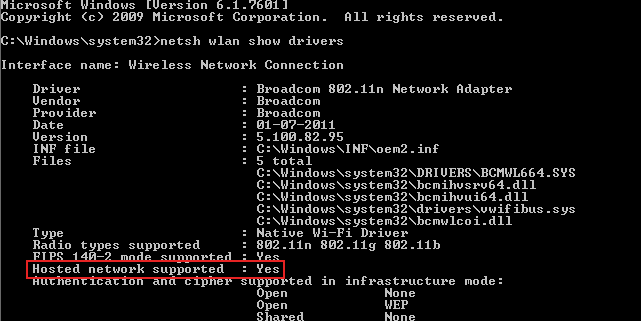
First check if your wireless network adapter support hosted network by entering netsh wlan show drivers into the command prompt and hit Enter. If it shows ‘Hosted network supported : Yes’ then continue to next step.
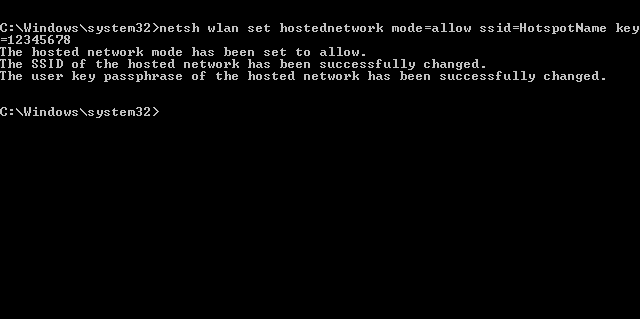
Now you have to set your wireless network’s SSID(hotspot name) and Key(password) which you will need while you connect to this network from other wireless devices. In the same CMD prompt enter netsh wlan set hostednetwork mode=allow ssid=HotspotName key=12345678 and hit Enter. You can change HotspotName and 12345678 to anything you like where key is the password of your Hotspot. It will setup and create your wireless hotspot network connection.
Enable sharing on currently active wired Internet connection on your laptop:
Before starting the Hotspot network, you have to enable Sharing on your wired Internet connection on your laptop to make it share Internet with virtual WiFi adapter. You have to do it once until you change your wired Internet connection.
To do so, go to Network and Sharing Center > Change adapter settings or in Start menu search for Network Connections. There you will see wireless network connections, out of which Wireless Network Connection 2 with ‘Microsoft Virtual WiFi Miniport Adapter’ is your hotspot network as shown in the image.
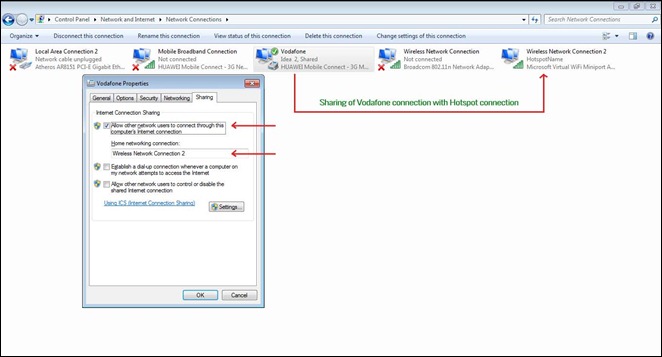
Now select your currently active wired Internet connection to which your laptop is connected and right click on it and select Properties, select Sharing tab and check mark ‘Allow other network users to connect through this computer’s Internet connection’ and Select Wireless Network Connection 2 as Home networking connection. And’ finally click OK to save changes.
Start Hotspot:
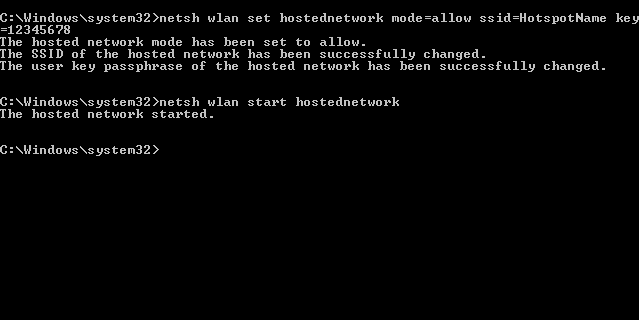
Now it’s time to start your newly created Hotspot. In the same command prompt window enter netsh wlan start hostednetwork and hit Enter. It will start your Hotspot network and makes it active. Now you can connect wireless devices to your laptop’s Internet connection.
To stop the Hotspot network, Run CMD prompt as an administrator and enter netsh wlan stop hostednetwork. It will stop your Hotspot network.
Above steps are for one time setup of Hotspot network and next time you can just Start and Stop this network whenever you want to connect wireless devices to your laptop’s wired Internet connection.
To make things simple you can create two batch files, one to start the Hotspot network and other to stop. It will make it easy and hassle free to start and stop the Hotspot without opening CMD Prompt.
Creating Shortcuts to conveniently Start and Stop Hotspot Network Connection:
Create two text documents and enter netsh wlan start hostednetwork in one file and netsh wlan stop hostednetwork in second text file and save them. Now change the extensions of both files from .txt to .bat and you are done. If you want to know how to change a file extension in Windows then here’s the guide on how to change a file extension in Windows.
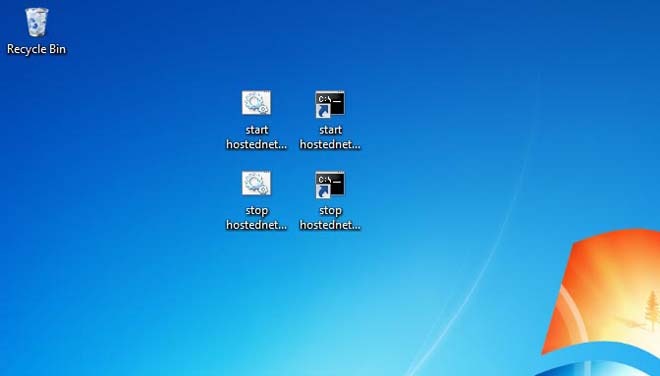
Now every time you want to start or stop the Hotspot, you have to run these two files as an administrator. To make things simple and run both the batch files as an administrator without right click on them every time you start and stop hotspot then, create shortcuts of both files and right click on both shortcuts respectively and select Properties, in the Shortcut tab click on Advanced button at lower right of the opened window and there, check mark ‘Run as administrator’ and click OK to save changes.
Now you are done with creating two handy shortcuts to start and stop Virtual WiFi Hotspot network on your laptop. You can move these shortcuts to your desktop or Pin them to Taskbar to conveniently start and stop Hotspot network.
Let us know if it helps you in creating the Virtual WiFi Hotspot on your Windows laptop.


Comments