Photos app on Windows 11 has an exciting feature: the ability to blur the background of images. Whether you’re enhancing your images for professional purposes or simply looking to add a touch of creativity, this feature provides a new dimension to your photo editing capabilities. Here, we’ll explore how to use this feature effectively, allowing you to create visually appealing images with ease. Let’s dive in and discover how you can blur image backgrounds in the Photos app on Windows 11.
To apply this effect, open your image within the Photos app and select ‘Edit image‘ from the toolbar. A new toolbar will appear, including the ‘Background blur tab‘ icon (located at position 1 in the screenshot).
SEE ALSO: Recover Details and Bring back that “POP” in Your Photos (Lightroom)
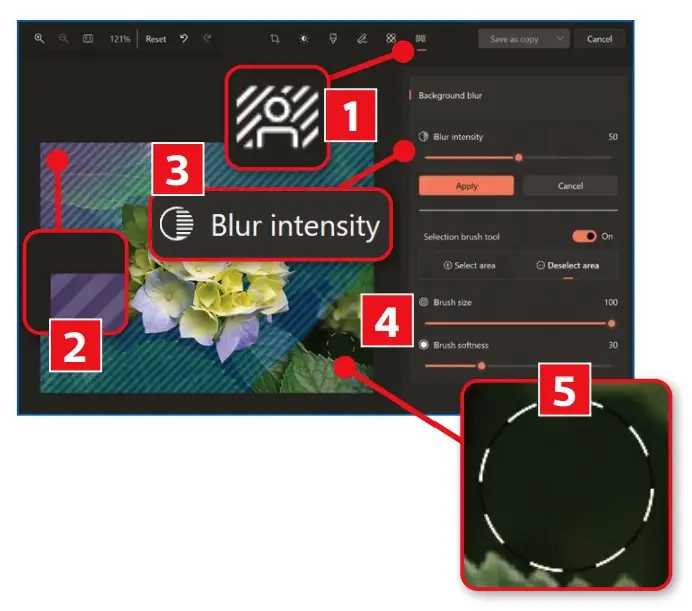
When you click on this icon, the app will automatically detect your photo’s background and briefly highlight it with a multi-colored striped selection (2). This visual guide indicates which area of your image will be blurred. You can fine-tune the degree of blur using the ‘Blur intensity‘ slider (3), allowing adjustments between 0 and 100, where 0 represents no change.
Should you prefer to manually blur or unblur specific areas of the background, you can enable the ‘Selection brush tool.’ This tool provides options for selecting or deselecting areas and allows you to modify the brush size and softness with dedicated sliders (4).
For example, in our demonstration, we chose to deselect an area. We painted over the lower-right corner of our image with a brush size of 100 (5). After clicking ‘Apply,’ the Paint app did not apply blur to the deselected area.
More: Does Transferring Photos to USB drives degrade photo quality?

Comments